
When you’re ready to apply these changes, you push the committed files to a remote repository. The repo might be your own filesystem, a server sitting in a closet, a hosted Git solution like GitHub, or a platform specifically designed for hardware like AllSpice.io
Push to the correct branch
As stressed in the previous post, always push your commits to the correct branch. When you clone your repo locally, git should automatically download the project files that associate these files to that repo. The remote server contains access permissions for pushing your commits to the repo.
It’s important to restrict people who don’t know how to correctly commit to the correct branch.
To ensure that you’re always committing to the correct branch, restrict people who don’t know how to correctly commit. Every user should be trained on git and given some practice projects to work with before being given write access. It’s easier to prevent a mistake than to correct it. Training should include pair check-ins and pushes for users who are new to git.
Once you have identified the correct branch, push your files to the branch. The commits aren’t part of the final design yet. The branch is a collection of commits that have been pushed to the remote repo. The commits get merged into your main or release branch via a pull request (PR). Because AllSpice is hardware-focused, we refer to PRs as design reviews (DR). After releasing the design review and merging the files from the development branch into the main branch, the design review is closed.
In software development, this is usually when the development branch gets deleted, and a new branch gets created for the new work. Because of the nature of ECAD files, they do not merge easily. If you change one location in a schematic in one branch and then change another location of the schematic in another commit, you cannot easily merge the files.
If you keep your development branch, any new commits to the development branch require a new design review to merge the pushed changes. Commits pushed to a branch accumulate and then are merged when a design review is completed.
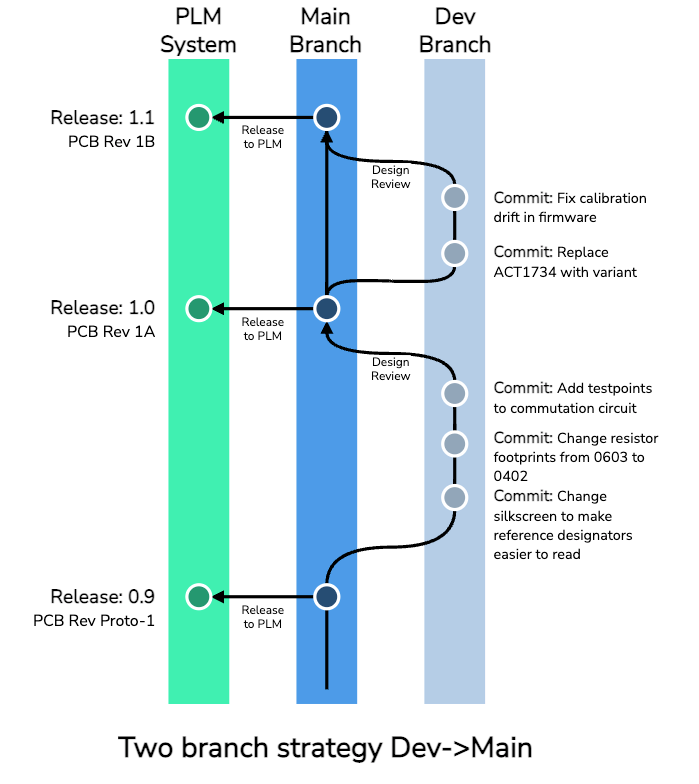
Because hardware development differs so much from software development, we recommend a branching strategy specifically designed for working with ECAD files. It’s not only simpler, but it will also often be more productive than the traditional software approach.
Each repo contains two branches, one main and one development (dev) branch. The main branch is the default branch and contains all the “correct files,” while the development branch includes the work-in-progress changes. When the engineers are ready for their work to be released, you create a pull request or design review from the dev branch to the main branch. When everyone is finished reviewing the design review, one of the users merges the collection of commits and makes copies of them on the main branch. The source files are effectively “released” once they are in main.
We encourage your team to rename the two branches to something familiar or related to your current process. Prototype→release, WIP→final, and development→production are all excellent labels for the pair of branches.
This strategy has the advantage of being extremely simple, making onboarding easier and remembering how it works as simple as counting to two.
This approach is not without its drawbacks. If you keep only one development branch, all the pushed commits will be included in the next design review. You will have to do some fancy command line work or use a git client to remove commits or cherry-pick some of them to a new branch. The single development branch is more susceptible to errors over time. There are many command line tools that can destroy or mutate your branches beyond recognition. Although all the changes that are merged to the main repo will be saved, you may wind up finding your development branch hopelessly corrupted. You also miss out on the advantage of segmenting the work by user or functional change.
Even with all these potential issues, we still recommend a dec→main branch pair for new users.
Branches: keep or delete
In the software world, most branches are deleted after the design review is completed. The history of commits is still maintained in the merged branch, so there is no archival reason to keep the branches. Many users find stale branches to be cumbersome to look through once the list grows beyond a certain size. Other organizations might have a genuine reason to keep the old branches around. Either way, you can follow a more sophisticated approach to branching.
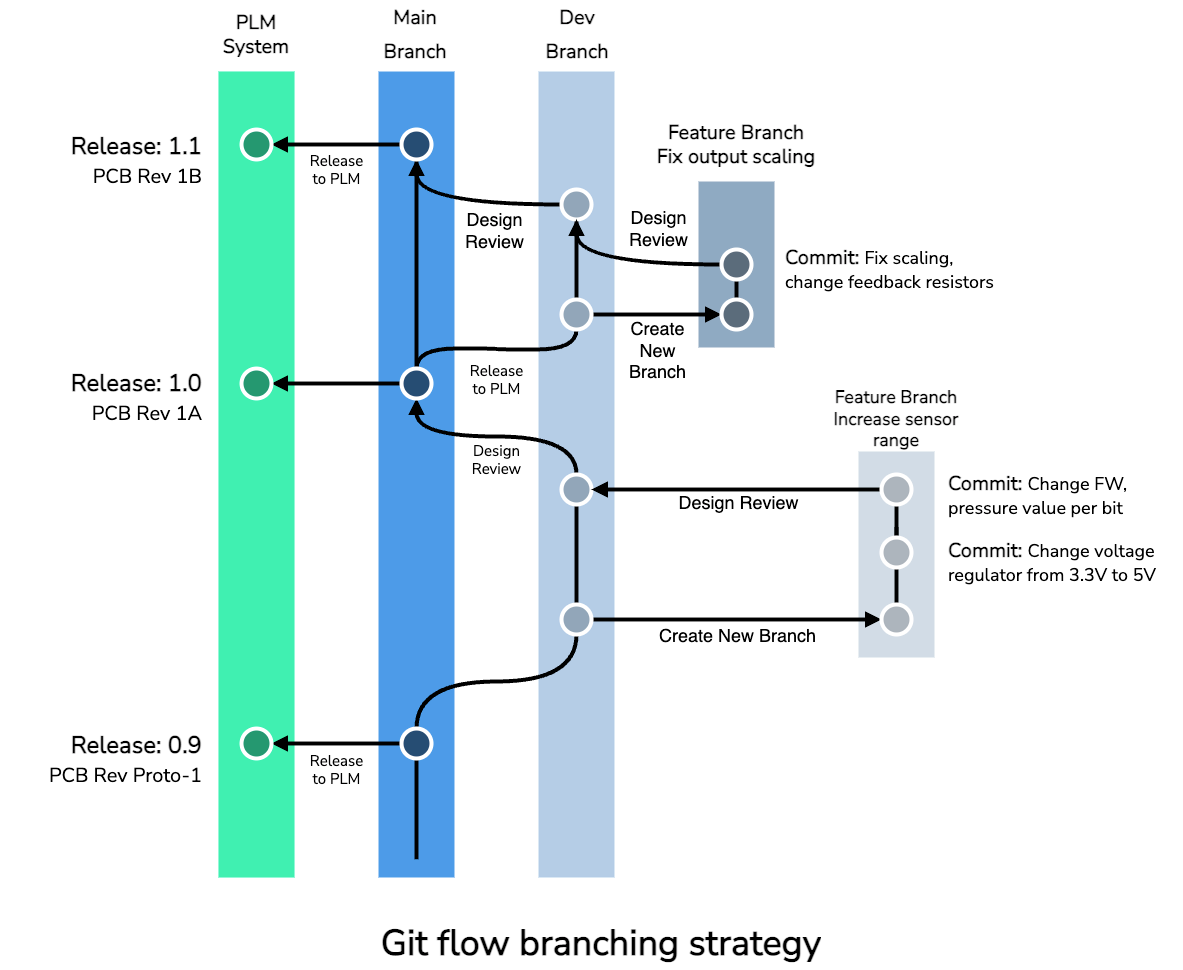
Git flow strategy is a process that starts off with the dev→main branch pair, but adds additional feature branches that merge into development, which in turn merges into main.
Each feature branch can be as specific as fixing a bug, adding a subcircuit, or contain all of the prototype changes for an entire circuit board.
If the user wants to fix a bug, they would create a bugfix branch. Then, they commit and push one to a few commits that change the files needed to fix the bug. The files edited in the bugfix commits are merged into dev with a design review. The final design might incorporate changes from more design reviews into the dev branch before conducting a final design review and merge into the main branch.
At the beginning of a design, when many different components and cross-functionality are being added to the schematic, it might be too much granularity to keep separate feature branches. Other groups might want to create a feature branch for large or important sub-circuits like an FPGA. Or, they may want to create separate feature branches so that different people can work on different schematic pages.
Because of the merge problem with ECAD source files, it is wise to divide work only when the changes can be limited to one person per file that changes. If two people are making different changes on the same file in separate branches, the merging process becomes a manual copy/paste that can lead to bugs and incorrectly transcribing the merge.
Most PCB layout files are a single file and cannot easily be partitioned among users, and should not be included in parallel branches. Schematic files are often separated by page or sub-module files and can be worked on by more than one person. If the file changes are going to be on separate files, they can be worked on in separate branches.
It is possible to lock files and prevent commits to them using the large file system (LFS) lock feature, but that doesn’t stop people from editing the files and attempting to push their committed changes.
Git flow requires much more coordination between team members. They may wish to set up an external project management tool to coordinate which files each developer can edit and how the work can be separated into separate branches.

Branching strategy: filtering

Filter branching strategy
When looking for filter branching strategies, it might be helpful to think of a physical analogy. Consider each branch as a bucket of liquid. Each time you add changes to the branch, you add a little more liquid. You may think or hope the changes in the branch are correct, but you can’t know until you hold a design review. Each person on the review acts as a filter, catching impurities in the water. It’s a lot easier to filter out problems when they are small and related changes.
It’s much easier to review large collections of changes if you know they’ve been filtered through a feature branch design review. Each layer of the filter makes it easier to detect issues and integrate the changes. Each filter layer makes it a little easier to ensure the final product has soaked up the design defects and missed market features.
Some organizations add additional branches like prototype, pilot, and final to their branch hierarchy. Each additional branch adds a chance to verify and validate all the changes to the system, but also adds another stage where the problems can be discovered and fixed.
It’s possible to maintain a new product introduction (NPI) workflow with only two branches, but the separate branches make the prototypes and final assemblies easier to distinguish. You can save a lot of money by not releasing failing, low-yield boards if you use the branch filtering system.
With hardware, it’s often required to build prototypes and small batches and wait weeks to months to make the next change to the design or the process. This filtering allows the deployed, released files to co-exist confidently while the files are being edited with fixes as they are discovered.

Deviation branches
Unlike the previous branching strategies that all flowed to one final main branch, deviations are offshoots from the main or a release branch. They are used to track changes that are applied to a subset of PCBAs after they have been assembled.
There are a lot of reasons to create deviations, but the fundamental reason among all of them is to save money and pull in the schedule. If a batch of PCBAs isn’t functioning, it is extremely expensive to scrap the boards and purchase new hardware. It might not be acceptable to wait for a new batch of boards to be assembled if there is a physical change to the board that can be corrected.
It doesn’t make sense to make a main release for a change if it is only applied to a few or a few hundred circuit assemblies.
Most organizations use some form of deviation to modify and track boards. This enables them to be released into the lab or field. The users would have a way of knowing that the electronics they’re using are different from the mainline revision and in what way.
Some deviations bring a failing circuit board to perform identical to the form, fit, and function of the main design.
- Replacing a consumer IC with a more expensive and over-specified, but available part
- Replacing a component with a taller part from the same part-family
- Adding white wires to add similarly performing components with different pinouts
Deviations can also contain small to large variations on the main designs form, fit, or function. Very often, prototype fixes start off as deviations to the main PCB, with cuts, jumpers, and new circuits added to test out the design changes. Some customers or field installations might require a change from the original spec that can be captured as a deviation.
The best method of dealing with deviations in git is to fork from the main release that the PCB is based on. If you are using git filtering, fork from the prototype, pilot, or production branch.
Custom branching structure
Expect the unexpected. No single git workflow is a one-size-fits-all solution. Even if you’re using a two branch dev→main structure, it still might be a good idea to create extra branches when the need arises. Git flow can be modified with extra workflows that are either temporary or part of your everyday process. There are no perfect answers to how you should structure your project, so feel free to model the branching in a way that makes your team productive. A large percentage of software projects use git flow, but many more use a custom or hybrid approach.
Summary
Git branches are powerful and useful. You can get away with two branches, a few, or an ocean of branches that come and go as your development progresses.
Start with one of these suggested workflows and then use your own experience to design the workflow that best suits your team. Talk with everyone who contributes, reviews, or consumes the files in the project and come to a consensus on your own localized best practices.
.png)
